Posts

Sharpening awareness

Image
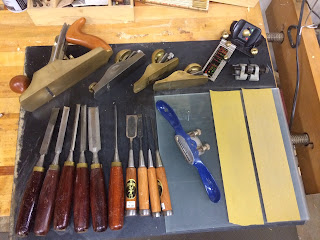
  The frame is fair, the backbone is in place, and the beveling nearly complete.  Let the planking commence!  Except that my current count of sharp chisels and plane irons is 1 and 0 respectively... and that doesn't include the spokeshaves that should be sharpened for work on the stem. After a hard year of on-board maintenance, I am long-past due to recondition my edges, and perhaps recondition my attitude about keeping them sharp.  Using the 1.5 inch slick I brought back from Japan a couple years back reminded me of the pleasure of perfect sharpness, and how critical it is to achieving the desired result.   I've sharpened well in the past, and I can do it again, so I have declared a building moratorium until I have a sharpening station in place, and have restored the edges on my hand cutting tools. Lie Nielsen is one of the great hand-tool makers in the world, and I've acquired a few of their wonderful products over the years.  They are also a...

Beveling and fairing the keelson and stem

Image
I took off the vertebral clamps from yesterday's glue-up and started fairing the result.  I have a first pass done the entire length of the backbone.  Next step is to check all the bevels carefully at every point along the keelson, and 'fair in' the stem with some pseudo planks clamped to the stations. I am on the threshold of cutting the garboard strake pair (the planks closest to the midline of the boat). about 2 1/2 hours

Getcha some backbone

Image
Yesterday I attached the transom to the building frame, screwed with angle brackets and vertical supports.  Positioning the transom on the supports is a bit tricky, as there are no fixed reference points for measurement. The keelson defines the centerline for the transom position... no ambiguity there. The full size plans for stations 5 and the transom indicate that the keelson notch for the transom should be approximately 4 inches below the notch on station 5.  Additionally, battens tacked to the sheer and one mid-plank landing project naturally to the transom landings to form a fair curve. Fiddling with the transom position with clamps eventually allows you to gradually adjust the transom until it approaches an optimal position.  Check, recheck, and screw the angle brackets in.  Done. This morning I beveled the keelson landing surface in the transom notch with my dozuki and the  1 1/2 inch chisel, dry fitted the entire assemblage, and mixed epoxy (150 ml...

Daggerboard slot

Image
I almost forgot to do this -- cut the daggerboard slot in the keelson.  It seems unnatural to cut a hole in the bottom of a boat before you even plank it.  Or at all, for that.  Much easier now, though, when you can use a drill press to hog the waste and then trim it up on the bench.  It worked nicely. There are few creative pleasures to match paring a buttery wood like Alaskan yellow cedar with a really sharp chisel.  Amazing, though, how easily one pares one's fingers given a careless moment of opportunity.  I've signed most every woodworking project I've undertaken with my own blood on these occasions.  Today was the day for my Auklet.  The signature will be safely sandwiched between the two laminations of the keelson. About an hour and a half, including the signing.

Proving the building frame (part 2)

Image
I finished (I think) proving the mold today.  I measured each facet of each station mold to the nearest millimeter and adjusted with a block plane any that were more than 2 millimeters off so as to make the molds as symmetrical as I could manage.  Having used battens to simulate plank landings, and sighted the result from as many perspectives as the shop configuration allow, my confidence in a fair mold is growing. I purchased the 4 mm Joubert Okume plywood, as well as some additional Alaskan yellow cedar (for thwarts and floor boards) and some sappele for gunnels.  I think I have pretty much all the wood I'll need at this point, with the possible exception of knees and breasthook. Before I start the planking I'll glue up the keelson laminations,  cut the dagger board lumen,  mount the transom on the building frame, and glue the keelson to it so that the backbone of the entire boat is in place, stem to stern.  I'll finish beveling the stem, bevel the ...

Building-frame Proofing

Image
Stepping away to think, inspecting plans, and spending time in the 'moaning chair' tends to reboot the building process.  Or at least it seems to have done in this case.   Yesterday's confusion was resolved by the process of proving the building frame with battens and in so doing, developing a stronger belief in the lines of the boat. I'm not entirely finished with this process, but it has helped find the correct position of the transom and improved my understanding of where things will come together (the plank landings, especially at the stem, and also at the transom.  A lot of beveling to do at both places. I think this would be a good time to varnish the transom in preparation to actually attach it to the building frame for planking. I also glued the stem to the keelson today. about 3 hours.

The missing wood stretcher

Image
Today was a fiddly day, working on shaping the apron, refining of the shape of the transom, positioning the transom on the transom braces, beginning the process of establishing a fair line for the sheer-strake, and working the keelson into correct position. This later activity required adjusting the depth of the station mold notches. The keelson is laminated from two pieces, previously milled and dimensioned.  The pieces were a a couple feet longer than need be, so i clamped them in place and rough cut them to a more suitable length, estimating the position that the transom would be in.  Except that I missed.  By about an inch.  Short. I looked everywhere for the wood stretcher, but my brother hid it.  There was no alternative to milling another full piece, and scarfing the two too-short pieces into one long one, and sorting that bit out tomorrow. I scarfed the two pieces (8:1 ratio), and glued them up, leaving them to cure, and went on with the shaping ...