Re-powering s/v Ripple
My Summer, 2017 Adventure
An irregular sound, a vibration untuned to the sum of your experience: this one was a momentary drop in RPM... 25, maybe 50 rpm. I bumped the throttle, right? Then it happened again, and denial shades into anxiety.
The opening hours of a 6 week cruise: Seattle, up the inside passage, over the top of Vancouver Island and a leisurely meandering through the inlets that indent the west side. But this journey ended just as it began.
A series of intricate diagnostic rationalizations, fuel filter and impeller changes availed us not at all. Lots of oil gone missing! Limping into Kingston Harbor, Ripple’s Yanmar 1GM10 turned the last of some 300,000,000 revolutions in my service.
Broken-hearted 1GM10
Only slowly did I surrender the hope of rebuilding my faithful one-lunger. As it happens, Yanmar does not make an oversized piston for the engine, as they enlarged the size of the cylinder when the 1GM transitioned to the 1GM10, and given that the water jacket for the block is raw water cooled (subject to corrosion), reboring the block is deemed inadvisable. Thus the scales tipped towards re-powering: an adventure entirely different than what had been planned, though by no means uninteresting.
The small size of the boat constrains the re-powering choices substantially, especially as there are no longer single-cylinder options, and weight is a significant factor. Ripple has a bespoke stainless-steel engine bed, and the canonical re-powering requirement was matching an engine to that bed. My early naive belief was that achieving that match was the main challenge.
The Beta Marine 14 emerged as a good prospect for replacement of a 1GM10, based on similar footprint, weight, availability (and the attraction of more power in a similarly sized engine!). Beta Marine is one of several companies that have marinized Kubota tractor engines, and their offerings have become popular in the US.
At the outset I had visions of a straight-forward replacement. Drill a few holes, replace some hoses, connect things up and bob’s yer uncle, eh? At the end of the day, re-powering Ripple ranks high on my list of most-complicated-projects-ever.
Having written a check for an engine, I began my education as an engine installer. Purveyor assurances of “we can make it fit” suddenly acquired the urgency of clearances of 1/16 “ in wood, 1/64” in stainless steel, and .003” in alignments. And that “we” business… well, that comes at $100 an hour. I’m a DIYer by nature and necessity, and I’m blessed with a brother with a good deal of experience in these matters. Looking back on it all, success would have been far more costly without his advice and guidance. If you decide to replace your first engine, enlist the counsel of someone with experience if you can.
This article is a what-I-did, not a what-to-do. It is offered as a guide to your own thinking about how to approach the daunting task of repowering a small wooden sailboat. Do not mistake determination for expertise!
I: The Theory
Marshall T. Rose, inventor of early email protocols (largely still in use) famously said
“The distance between theory and practice is always smaller in theory than in practice.”
Still, it’s good to have a roadmap of the path ahead. In my own case, I admit that I had only a vague notion of where I was going. I just knew I wanted my boat back. WIth the benefit of 20/20 hindsight, I offer the following map for others who may embark on this journey. Even if you elect to have the work done by others, understanding the process and choices involved will increase your confidence in the result, allay your alarm at mounting expenses, and perhaps keep your installer on his toes.
Considerations for engine replacement require careful attention to the following:
- Engine mount footprint - compatibility with existing engine mounting bed
- Gearbox ratio
- Engine dimensions - Will it fit within existing engine compartment constraints?
- Engine compartment cooling - Diesels require copious amounts of clean air
- Raw-water supply requirements may be different than the engine being replaced
- Fuel tank, supply hoses, fittings, and filtering require close examination and possibly renewal
- Exhaust system design is both critical and tricky
- Electrical system components and capacities must match the new powerplant
- Remote control cables and controls, Instrument panel, routing for wiring harness
- Propeller suitability is unlikely to be the same for old and new engine.
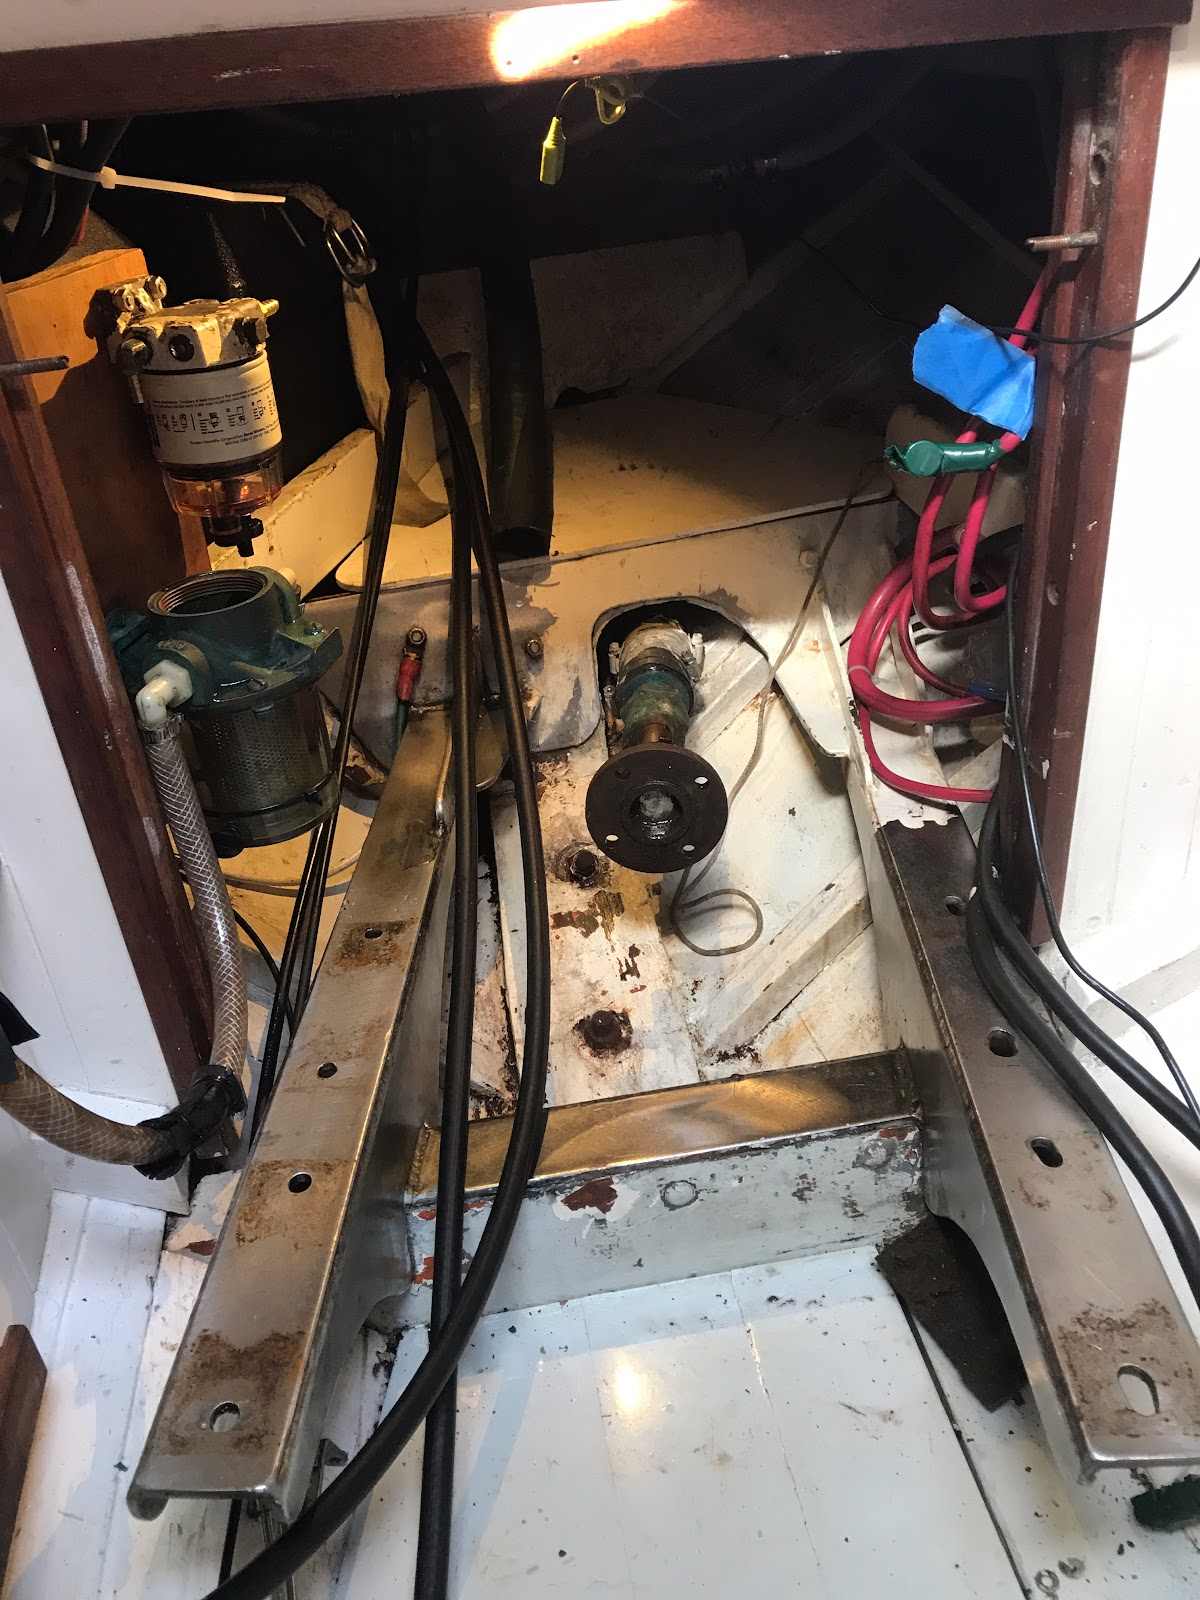
II. Engine mounts
Fixing a new engine on the mounting bed is not the first step in the installation, but matching the new engine to an existing bed is the first thing that must be assured. The Beta Marine 14 is touted as a close replacement for the 1GM10, based primarily on similar widths of engine mounts.. This is no small factor, as significant deviation will require substantial modification to any boat. The engine bed is a bespoke stainless steel structure that is fastened to the frame of the boat, and changing it in any fundamental way would be costly and difficult.
The complexity is amplified by the fact that the original engine was added after the build, meaning that the shaft and engine are not aligned with the centerline of the boat, The offset shaft adds idiosyncrasies to the handling of boat, and also imposes some replacement constraints.
 |
| The engine bed, sans engine |
The Beta Marine 14’s footprint was close to the 1GM10 in width (a saving grace) but required new holes for bolting down the engine mounts. Each mount is attached to the engine bed with two bolts, thus requiring 8 holes to be drilled (a few were enlargements of existing holes). This turned out to be an entire day’s project and some expensive drill bits.
I started by scribing lines along the rails where the plane of the shaft coupling intersects the rails, and measuring from these reference points to where the engine mounts should be located. The bolt holes are drilled oversize to allow for aligning the engine. Drilling holes in stainless steel isn’t simple under any circumstance, but in the cramped confines of an engine space… well, let’s just say it was among my least favorite tasks in the process.
It could have been much harder. The stainless steel bed was very well done -- surfaces were square to one another, and the rails are parallel. The craftsman who fabricated it did a great job, and it made my job easier.
Engine mounts for the Beta Marine engine are more rigid than for the Yanmar. Once in, the engine bolts down pretty tightly, which was disconcerting for me, as the Yanmar “floated” on the massive rubber shock absorbers of the mounts. This made alignment of the Yanmar trivial by comparison, and I am given to understand that the strategy reflects the rougher engineering of the older, one cylinder engine. The Beta 14 is more rigidly coupled to the boat, and I wondered if vibration would be a problem.
The Beta 14 comes with a vibration dampening device made of hard plastic and metal, which is intended to sit between the coupling on the engine and the one on the shaft, recommended for all installations. It became apparent that I would be unable to install this damper in the drive train without removing the shaft from the boat and having the shaft shortened by about an inch and a half. I elected to leave it out rather than go to this additional expense, a decision I may yet revisit at next haul-out.
Aligning the engine was at once fussy and brutal. First off, you have to horse the engine onto the rails. I did this alone, with the help of a block and tackle rigged to the boom. Even then, the 200 lb engine is not so easy to get off of its home-made wooden cradle and onto the stainless- steel bed. I had attached the engine mounts loosely to the engine block supports, and once eased onto the bed, I nudged it into a position where a couple of bolts could be loosely attached to the engine bed. Easy enough to then align the remaining engine-mount bolt holes and loosely fix the engine to the engine bed.

Beta 14 engine mount
Next you’re nudging the engine and transmission into rough alignment with the shaft coupling. The engine has a coupling plate, the shaft has a coupling plate, and the goal is to get the four holes in each to line up, and then align the planes of the two plates so that the variance among the 4 bolt holes is about .003 inches. That’s about the thickness of a human hair.
My strategy was to bring the two couplings close enough to slip the bolts in loosely, and then fine tune the clearances to bring them within spec. The intentional slop in the mounting-bed bolt holes affords some leeway to move the engine around on the horizontal plane of the engine bed. The mounting posts have bolts that are raised and lowered so as to provide precise vertical alignment of the coupling, which is relatively easy. The lateral adjustments involve kneeling, wrapping your arms around your engine in an uncomfortable hug, and shaking the engine until it settles in close to the desired tolerance. Measure, rinse, repeat. Approaching the goal, a few carefully-calibrated mallet blows to the engine block flanges provide some fine-tuning.
After several hours of shaking and nudging and grunting, I wasn’t close. I got one of the coupling bolts in easily, and sometimes a second, but no more… all of this happens blind, of course… awkwardly reaching around the engine in a confined space, fingertips searching for alignment. I concluded that the holes I bored in the mounting bed hadn’t given me enough leeway. I took the engine off the bed and went to work on the holes with a rat-tailed file chucked in a drill. Re-install the engine... no luck. At this point I’m talking to myself, using mostly bad words.
I removed the engine, ready to work on the holes again. Wait… could it be that the hole spacings on the couplings are different?! Indeed, they are not the same! The hole patterns on these 4 inch diameter couplings vary by ⅛ inch! I had eight hours of frustration invested in an impossible task that an experienced installer would have recognized at the outset. So, I had to procure a new shaft coupling, and a wheel puller to remove the old one from the shaft (25-years stuck), and install the new one. Another half day, but no more hole-drilling at least.
The alignment went fairly smoothly with an appropriately sized coupling. I don’t have the experience to judge what is good enough… the answer is relative, and expressed in the vocabulary of long-term wear, and I was still a good distance from initial engine start-up. Not being able to install the vibration damper caused some anxiety. The Beta 14 is substantially more powerful than the old 1GM10, and I was concerned that noise and vibration would be substantially greater.
III. Water
The Yanmar block was raw-water cooled… Sea water entered a scoop below the water line, passed through a strainer, and was pumped through the engine block before being injected into the exhaust gasses. A simple system with the notable deficiency of increased corrosion within the engine block. Most engines are more sophisticated (and less susceptible to corrosion). Raw water enters in a similar fashion, flows through a heat exchanger, extracting heat from the combustion process, and is injected into the exhaust gasses. The cooling “fresh” water that circulates in the block is (a 50-50 mix of water and antifreeze) transfers heat from the engine to the raw water for expulsion.
Perusing the engineering drawings for the Beta 14, I realized that the water feed was 19 mm (¾“) rather than the ½ inch that served the Yanmar. The imperative for replacing the raw water through-hull fitting settled in. A similar situation with the size of the exhaust mitigated in favor of replacing that as well. Happily, these realizations occurred before I took delivery of the engine, so I could to the work on the thru-hulls with an empty engine compartment. The job would have been far more onerous had I discovered the need after the engine was in the boat. This will be obvious to most, but for a first-time-installer, one cannot be too careful in planning every detail. I should note that the engine dealer did NOT alert me to possible water supply or exhaust system mismatch. That shiny new engine you bought is yours, and yours alone. As mariners, we take pride in being utterly and solely responsible for ourselves and our boats on the water. The same applies here.
That size difference required that the hoses and raw water strainer needed to be replaced as well. I selected the Vetus FTR330 raw water filter for the new system, which turns out to be more easily inspected than the old one -- consolation for what seemed a constant hemorrhage of treasure at this point.
IV. Fuel lines
Having the engine out made it easier to replace the fuel lines end to end. A simple enough job, but hanging them beneath the cockpit floor required wriggling into tight spaces where I would spend a good deal of time and acquire a lot of bruises to ribs, elbows, and knuckles.
The Racor fuel filter was only two years old, but initially I kept it, in spite of some corrosion to the filter body that made me suspicious of potential air leaks.
Having no engine gave me the opportunity to clean out the bilges and paint the engine compartment. Oi... what a mess!
V. Water Muffler Exhaust System
Of all the systems associated with a marine diesel, the exhaust system is most mysterious and most vulnerable to catastrophe. The great majority of boats employ a wet exhaust characterized by the gurgle-splash-gurgle-splash of cooling water being forced through a reservoir (the water-lift, or muffler), and out the exhaust hoses and through-hull. But, you say… There are hundreds of thousands of boats out there that venture forth from the dock and operate successfully every day... how hard can it be? The answer is, very hard indeed, especially on a traditionally-designed wooden sailboat of modest size and ridiculously constrained mechanical spaces.
 |
| Vetus water muffler |
When you come to understand that the engine manufacturer’s guidelines for such installations cannot be met according to the letter of the law, then judgment comes into play, and compromises are struck that will be adjudicated in the court of weather and seas and physics.
A marine wet exhaust involves the mixing of raw cooling water with hot exhaust gases at the exhaust manifold elbow, whence it flows into a water receptacle, and is subsequently forced up through an exhaust hose and leaves through the exhaust through-hull in that characteristic intermittent spurting familiar to most boaters. The water cools the exhaust gasses, and attenuates the noise, hence the name water lift or water muffler. There are many factors impinging on the function of the system, and failing to manage them can result in water being siphoned into the cylinder head or forced in by a combination of wave action and hobby-horsing of the boat in heavy seas. The result is catastrophic failure.
Every boat is different, and sailboats are particularly difficult due to limitations in space. Ripple, being a small boat to begin with, is particularly challenging. The exhaust installation could simply not be configured so as to meet all of the manufacturer’s installation recommendations. What to do?
Happily, there is an excellent tutorial on designing and installing wet exhausts that is available online. The particular virtue of this article is explanation of why each design parameter is important and how an installer can compensate for deviations from the recommendations:
Guidelines for Evaluating and Installing Wet Exhausts
Jerry Powas and Dave Gerr
Make no mistake about it: as a novice engine installer you must be aware that decisions you make in the design of your exhaust system could lead to catastrophic failure in adverse weather and sea conditions. Your only peace of mind will come from understanding the implications of every decision you make as best you can. The dividend you will earn is an appreciation of how your engine and its associated systems work in concert, and a heightened awareness of your own responsibility to attend them.
As the Beta 14 requires 50 mm exhaust connections as opposed to the 40 mm for the 1GM10), I needed to replace all my exhaust components, from hoses to through-hull.
The Beta 14 has a high-rise exhaust elbow option, which I ordered, and subsequently exchanged for an even higher high-rise exhaust elbow. It’s highest point is a scant inch and a half below the cockpit decking, so close I thought it prudent to guard the underside of the decking with a heat-resistant bridge to protect the decking and nearby wiring. The elbow is so high that the engine could not be put in place with the elbow installed, so it went on after the engine was in place.
The water lift muffler I selected is the Vetus NLP50-S, an innovative, two stage, high-capacity muffler with swivel input and output couplings and a swivel joint connecting the two stages. These joints make it relatively easy to adjust the device to fit the constrained space of my engine compartment. It is a brilliant design that allows maximum flexibility for positioning the input coupling from the exhaust elbow and the output coupling to the exhaust through-hull.
This makes the job of connecting exhaust hoses in a constrained space easier than it might be, and allows optimising the location of the device so as to protect the engine from sea water back-flow. I chose the high-capacity version of the two-stage muffler in order to provide sufficient capacity to accept water volume equivalent to the entire run of exhaust hose from the water muffler to the exhaust through-hull in the event that a heavy following sea forces water into the exhaust port.
I also bought the Vetus exhaust hose. It is pricy, but all exhaust hose is, and the Vetus hose is more flexible than others, substantially easing installation.
I added a siphon-break that was not part of the my previous installation. Siphon breaks are advised when there is insufficient vertical distance between the injection elbow and waterline. Also a Vetus product, it is easily adapted to a range of hose diameters. I cannot speak highly enough for the innovative products this company sells.
VI. Control Cables and Instruments
Ripple had another curve to throw once the engine was running. Having hooked up the control cables the same way as the Yanmar, I discovered that the shift worked exactly the opposite. Putting the gear shift/throttle in forward shifted the transmission into reverse.
The easy bit is that Morse controls allow you to shift the behavior back to normal by unscrewing the flange that affects the movement, and flipping it 180 degrees. This change takes about 10 minutes, including the time to remove the Morris control unit from the bulkhead.
The hard bit is that, in my particular installation, various pass-through holes for the cables needed to be repositioned to make the controls work smoothly. This required removing the fuel tank. Still, doing so took only a couple hours, and the result was just what was needed.
The instrument panel required substantial installation effort as well. I elected to change the position of the panel, which entailed significant carpentry effort, but resulted in a location that made more sense in my small cockpit. I purchased an optional panel with dials for all engine functions in addition to the warning lights and buzzers that come standard. I don’t want to be in the dark about what is happening with my engine.

 |
| Instrument panel installation |
The new panel had a significant impact on interior finish, though, and in the months following the installation, I’ve rebuilt cabinetry to accommodate those changes and improve organization for tools within the cabin.

 |
| Cabinetry update |
VII. The Dark Art of Propeller Sizing
I had already gone through initial start-up procedures -- Putting oil in the engine, anti-freeze in the heat exchanger, bleeding the fuel lines. The engine started easily after a cough or two. Relief! I followed the installation instructions concerning running up the engine at the dock under no load, and then partial load. The next day I would take her out and see if she performed as expected!
She did not. Fifteen minutes at 50% power was fine, as was fifteen minutes at 75% power. But the engine RPM would not rise above 75% power (2700 RPM). I hoped that a linkage adjustment would solve the problem. It did not, which left the propeller as the likeliest culprit.
Ripple’s original prop was a 12 x 12 two-blade sailor prop. Twelve inches in diameter and 12 pitch. I had never been able to run it up beyond 3200 RPM with the Yanmar, but that engine was more than two decades old, underpowered for the boat (and the prop), and I didn’t feel good about running it that hard in anycase. I wanted to move from a two-blade prop to a three-blade prop, but thought I might get away with the two blade prop for the rest of the season. It surprised me that the Beta 14 would not spin that prop above 2700 RPM. Clearly it was not the right prop for my combination of boat, engine, shaft, displacement, and gear ratio.
The story takes yet another turn when I described the issues to a propeller specialist who sizes propellers as part of his work. Three different sources have suggested that the prop I need is likely to be a 12 x 8, three blade. Twelve inches in diameter, 8 inches of pitch.
Pitch is a measure of the distance a propeller will travel in one revolution through an ideal medium (frictionless jello is sometimes invoked). My 12 x 12 two blade should travel 12 inches through the jello in a revolution, which is an aggressive pitch. In times past, I never wanted to run my prop past 3000 or 3200 RPM at most, as the engine would smoke (heavy load) and the vibration and tone of the tired old (underpowered) Yanmar were unsettling. What I didn’t fully understand is that I couldn’t run it higher, in part, because it was too much propeller for the boat/engine/gearbox configuration.
As the Beta 14 was about, 50% more horsepower, it astonished me I couldn’t get beyond 2700 or 2800 RPM. Looking more closely at the gear ratios of the old and new gearboxes, the new one turns fully 25% faster at a given RPM. I started to wonder whether I had naively neglected to take this into account, and wondered if I would ever be able to match propeller, boat, and engine.
My consternation was increased when the propeller specialist said he would be surprised if a propeller of the size suggested by the computer models would gain more than about 400 rpm of the shortfall, leaving me an engine that would turn up no more than 3100 or 3200 RPM (the Beta 14 is rated at 3600). Not a happy prospect, and one liable to compromise the engine’s longevity.
Three independent sources had suggested that a 12 x 8, three-blade was what was right, however, so I didn’t feel like I had any choice. The propeller (and another haul-out to change it), constituted another break-out-another-thousand occasion, and the prospect that the result would not be satisfactory was more than a little discouraging.
 |
| Ripple's new propeller going into the water |
Come the day of the swap, I motored over to Canal Boatyard and they quickly had me hanging in the slings for a short round trip that would last little more than a half hour. Randy, ever my guardian angel brother, helped me swap out the new for the old, and they dropped me gently back in the water.
All my fears dissolved in the scant mile from the boatyard to the Fremont bridge, and once under, I went right out to Lake Washington. The new propeller achieved more than I could have hoped for. Smoother, quieter, sized appropriately: I reached the 3600 RPM top end without difficulty. It is astonishing how much better the whole system operates with the right propeller.
Should I have selected a gearbox option matched to my old gearbox? I can’t say. The new configuration works quite well, but having a more slowly-turning prop (at a given RPM) might have been better still, both from a vibration and fuel economy point of view. Suffice it to say, some expertise injected at the engine selection stage would have reduced the anxiety and possibly have improved the final result.
VII. Sea Trials
Over the coming days I spent a lot of time running out to Lake Washington for further testing, and while the engine ran well, it suffered intermittent symptoms of fuel starvation. The first lesson of diesel engines is fuel starvation is almost always air in the fuel lines. I had replaced the fuel lines with new hoses, and all those new connections were suspect. I started working through all of them, and right away discovered that I has not installed a hose clamp on the line that fed the fuel lift pump. Rectifying this oversight seemed to eliminate the problem, and I decided to go ahead with plans for an extended trip of a couple of weeks.
Six hours into my journey north to British Columbia, I started to experience the fuel problem again… the engine would slow down, and then oscillate for a time before returning to normal… sometimes enough to stall the engine. I kept track of the interval between these events, desperately seeking a pattern that might lead me to the solution. Over the coming two weeks, the problem seemed to get worse in spite of various field-repair efforts. The main suspect was my Racor fuel filter, and at various points I changed filters, re-installed couplings, field-stripped it and cleaned it thoroughly. Near the end, I wrapped Rescue tape tightly around every connection and gasket mating. Nothing helped. The last day of the trip, I took it out of the circuit entirely, and got 8 hours of perfect running for my efforts. But not nine. The remainder of my run back into Seattle was punctuated with the anxiety of multiple faltering and stalling events.
Back in the marina, I decided to take the entire fuel system apart and re-install it (including a new 500 series Racor filter unit). My brother asked me if I were confident of the fuel tank. Much earlier in the engine installation, he had suggested blowing into the fuel uptake tube to confirm that it was open, and I had done so, eliciting the soda-straw sound of air burbling into the fuel. I reminded him that I had done so, and demonstrated. Except that this time, it didn’t burble! The uptake tube was clogged.
Randy brought over his electric oil pump, and we started pumping fuel out of the tank and into fuel cans. The pump seized almost immediately, and disassembly of the pump revealed that a slug of oil-sorb cloth had found its way into the tank at some point, and when the pump sucked that up, it seized. Filtering all the fuel and cleaning the tank solved the problem, and finally, the re-powering event that had consumed most of the summer was complete. Ripple is right once again.
VIII. Lessons learned
Few experiences have taught me as much about my boat as replacing her engine. I am cognizant that the decisions I made as a rookie installer project far into my future, and I won’t be sure they were all the right ones… well, ever, really. It may be years before time and circumstance thoroughly challenge every aspect of the exhaust system design, for example.
Doing an engine installation forces you to understand and accept the compromises that must be made, and it makes one vigilant about keeping track of operation of the boat propulsion systems in all their complexity. It certainly makes maintenance more rewarding, and starting a maintenance log for a brand new engine will be a boon to myself and Ripple’s future owners.
If you embark on such a task, avail yourself of all the resources you can find, and pore over them. Beta Marine makes technical drawings and installation guides easily accessible online, and going over them many times saved me painful mistakes. I even found an inconsistency between two related diagrams (they were drawings for a European version and a US version of the engine, and the raw water intake diameters did not match). If you don’t understand something, don’t assume that it is correct… ask for an explanation. Beta also runs an online bulletin board where questions can be resolved quickly and authoritatively. Look for such resources for whatever engine you purchase.
Following my installation, I discovered the Facebook group: Recreational Marine Diesel Engine Maintenance & Repair Discussion Group. It has become a favorite online resource, primarily as a reminder of how little I actually know. Each question attracts many replies… often contradictory, but you’ll get a spectrum of solutions to try in your mind and maybe on your boat.
I learned a great deal about diesel engines and the intricacies of their marriage to a boat in three months. But I do not fool myself regarding my skills -- especially my diagnostic skills. I embraced and discarded various theories about my fuel starvation problem, for example, massaging the evidence to suit my beliefs, hopes, and denials at various points. It is easy enough to fool yourself, but you can’t fool the engine.
We are masters of our vessels, and entirely responsible for them, but none of us is fully qualified, and cannot be in a mere lifetime. But it is more than a little satisfying to take a few steps towards the ideal.
Fair winds and following seas… but keep an eye on that exhaust through-hull!


Wow, what a thorough write-up!
ReplyDeleteI couldn't tell what went wrong with the original Yanmar 1gm, and how did it become unrepairable? Also how many hours did it have on it? (Not sure from 300 million revolutions what that equates to, without knowing average RPM).
Thanks, Patrick. Sorry not to reply sooner... couldn't get my browser to accept replies!
DeleteThe Yanmar had 2500 hours on it... About what people tell me you can expect from a 1GM10 (though, with a bit more care, I think you could do much better -- regular flushing of the block might help, and closer attention to the thermostat, which may have contributed to my engine's demise
Where do you keep S/V Ripple today? I'm close to embarking on a similar journey - looking for the right wooden sailboat in need of a caretaker. I'm also a CWB/Seattle member and Seattle resident. I just discovered your blog and I'm really enjoying re-living your experience. Hope to meet you in person and see your beautiful boat up close someday soon. I'm sure I would benefit from lots of what you have learned over the years. - Steve
ReplyDeleteThanks for the kind remarks, steve... I'd be happy to get together and show you Ripple and talk about boats! I keep Ripple on Lake Union.
DeleteOK great! The boat I'm looking seriously at right now, a 32' Alden design sloop, was recently re-powered with the same Beta 14. Are you happy with that motor now that you've had more experience with it?
DeleteI'll probably keep my boat on Lake Washington, hopefully at the marina in Leschi which is only 10min from home. I figure I'll be mostly daysailing and easy/quick access will encourage more use.
Also - who did you use for your survey? I will need to find someone with wooden boat expertise for sure.
Steve,
ReplyDeleteif you go to my profile on the blog, there is an email link that i've activated... send me a note and we'll make plans to get together.
I am happy thus far with the Beta... grateful that I was able to get it all working. They have, it would seem, a pretty good reputation, though engine type is definitely a religious thing... who's going to say anything bad about something hey just spent 10 or 20K on?
I don't have a name to recommend as a surveyor... lets talk about that. I'd be happy to look at the Alden as a fellow boater with experience in wood, but I am NOT a qualified surveyor
Great account of your experience. I share the experience of denial that makes a person want to ignore that change in vibration...
ReplyDeleteI engaged a professional diesel / installer, selected the Beta brand, and even living within his professional cocoon, ran into many major and minor adjustments to translate from the "drawing" to the final placement of the engine. But, we remained calm and I'm much more confident with the knowledge gained. And, even though I would have preferred to avoid an engine replacement, being able to do all the other things in the engine compartment, possible with the engine removed, I am much happier when I open the hatch and have a look around. We utilized Beta's engineers also to verify the propeller sizing, and I learned the relationship between that and RPM...who would a thunk...
I complement you on your writing style and honesty about what you found and how you found it...I mean, adsorbent cloth in the tank??? I am guessing it was left over from a prior cleaning. Thanks again and pleasant travels.
Thank you for your kind remarks, Doug. It is nice to have a new engine, of course, but I agree with you that the additional knowledge and confidence are really important benefits.
DeleteHad to come back and re-read this informative article because, well, it looks like our Summer Adventure 2018 will be putting a new Beta 50 in Yahtzee! Thanks for the great insight, Stu!
ReplyDelete