Posts

Showing posts from 2013

fitting the keel

Image
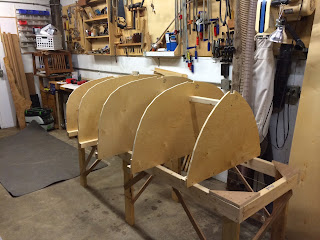
Today is Christmas Eve -- not much boat building in recent days, but while finishing up a project for the holidays, I took time to fit the keel and work out how to fit it around the daggerboard trunk.  I confess to having miss-cut a version a few days back which made evident the need to do a carefully measured lay out.  I used a scrap of the Okume plywood (foreground), and took measurements every 3 inches to define the bottom curvature.  I cut out and smoothed this pattern until I was happy, then traced it onto the Alaskan yellow cedar blank.  I band-sawed the piece, and did some further shaping with a block plane and  sanding block.  I'll do some additional tweaking of the fit and taper and shape the skeg portion, and laminate sisters to the portion adjacent to the daggerboard, and taper them.

Getting unstuck

Image
All the plank are hung and filleted.  The fairing compound totaled five pumps of epoxy, and enough filleting microballoons to result in a consistency of peanut butter.  A lot.  I used a putty knife to apply the epoxy, dragged putty along the joint with a gloved fingertip, scraped excess off with the putty knife, both sides of the fillet, smoothed a second time with a fingertip, scraped again on both sides, smoothed a third time, scraped again if necessary, smoothed, until I was happy with it, always ending with a smoothing operation.  When all 14 joints were done, i cleaned up the planking with a rag wetted with denatured alcohol, and dipped a gloved fingertip in alcohol for a final smoothing of all the fillets.  The next day, I created a small bullnose for 120 grit sandpaper, and sanded the fillets till all the gloss was gone, and no rough surfaces remained, to the point that one can run fingertips rapidly along all joints without risk of splinters or catches.  I'm happy with
I thought I knew how to run this blog site, but I am unable to respond to comments.  This has happened to me on more than one occasion.  Duh

Books to build by

Image
Plank 7 is curing as I write this.  I had hoped to finish it yesterday, and be fitting the sheer strake today, but I made an error that cost me some time yesterday, and thus finished up #7 today.  If all goes well tomorrow, the last plank will go up, marking the midpoint of the building process.  My suspicion is that it is closer to thirdsies. Hanging planks is becoming old hat, and as I prepare to move on to the 'outbone' -- the outer stem, the rails, the keel and the skeg, I am reading the relevant parts of the two boat building books I am relying upon.  A good time to say a few words about these references. Auklet is an Iain Oughtred design.  Oughtred is perhaps the best known designer of glued-lapstrake wooden boats, and to undertake one of his designs without his book on the subject would be nearly unthinkable.  For all that, I like the design far more than the book ( Clinker Plywood Boatbuilding Manual ).  It is intended as a manual for clinker plywood boatbuilding

Six down, two to go

Image
 Plank 6 went up today. At this point, it is pretty routine.  I've sorted the spiling process, my planks are hitting their station lines, and cutting out the planks is a snap.  Cutting them by hand with the dozuki razor saw is far more accurate than guiding a jig saw, and results in an edge that requires little or no cleanup. The spiling process works much better now that I have the sequence (bevel first) squared away.  Though, the shape of this last plank surprised me, and even caused me to put the pattern back on the molds to confirm that I'd done it right. Cutting the gains is (finally) routine and done with confidence.  The glue-up process (straight epoxy for wetting out the surfaces, followed by thickened epoxy for gap-filling adhesion) is straightforward, if a bit messy. Laying out the clamps ahead of time, with everything needed close at hand, makes the glue-up uneventful. At December temperatures, there is no urgency concerning 'pot time', so

Bevel, then spile (duh)

Image
  I spiled and glued-up plank 5 today,  and came to a realization that I should have figured out earlier.  For previous planks, I have beveled the landing for the next plank just before hanging it.  I realize now, I should have beveled the landing prior to spiling.  So doing brings the top  batten plane (the plane of the last plank landing) into closer alignment with the plane of the bottom batten of the pattern (the plane of the next landing).  This results in a spiling pattern that is significantly less twisted, which seems to result in a plank that is less distorted. It may be that I have overestimated the impact of this change, as this plank (the 5th of 8 pairs) would have been easier anyway, but it is nonetheless clear that this is the right way to do it.   The plank went on more easily than any previous.  About 4 hours to spile, fit, cut gains, and glue up the pair.

Plank 4

Image
Today was the first day that I've spiled, cut, fit, beveled, and glued up a pair of planks all in one day.  Four and a half hours.  The gains were much easier to cut for this plank, and they fit nicely.  The bow section was less tortured than previous planks.  The last 4 should be easier still.

Plank-3 Glue-up

Image
Plank 3 went on today.  It felt a bit tortured, especially at the bow.  The glue-up at the bow was messy and required a fair amount of force to bring the horns of the plank to meet with the gains cut in plank 2.  I used every clamp, and slammed a couple of temporary retaining screws into the stem as well. Cutting the gains continued to be a struggle, though, the new shoulder plane (and my own growing experience) improved that substantially.  For the first time I cut the external gain on the bench (or at least two thirds of it, so as not to make the end too fragile).  We'll see how that works.  It certainly is far easier than managing the winding bevel on the stem. I was careful this time to align the tips of the clamps so as to have clear access to the entire length of the seam on the outside, and I cleaned up the squeeze-out and stripped the tape before I left. The shoulder plane is superb. About 3 hours today.

A shoulder to try on

Image
My gut feeling at this point is that cutting the gains -- the rebate where planks transition from overlapping to flush -- will be one of the dominant esthetic touches on this boat, and perhaps the hardest to get right.  I ordered a small (#1) Lie Nielsen shoulder plane to make this job go more smoothly, and it arrived today.  It is a thing of beauty. Tomorrow I will give it a try on plank 3, which I spiled and cut today. The first two planks look and feel fair.  I'm still not sure about my gains, but when the are filleted and sanded, i think they will be fine.  I do think I will try to increase the length of flush mating surface by an inch or two.  I did the lattice and batten spiling thing again, and cut the pair of #3 planks.  They seem slightly oversized, and I'm wondering if the spiling technique is causing this, or whether i need to adjust the creation of the pattern.  The landings where planks 2 and 3 overlap will be wider than the half inch called for in the pl

Second Plank

Image
The second pair of planks went on today, the first pair for which the wedge-clamps are used.  I waxed the jaws of the clamps with paraffin to reduce the chance of gluing clamps to the boat. I marked the fit for both planks, traced the lands from beneath, taped off the plank to reduce squeeze-out mess, and cut the attachment gains to match the receiving gains on the garboard. I confess confusion about how these matching gains should best be cut.  Both books I have are vague about it.  I cut 9 inch gains on the garboard strake, cutting down through two of the three plies (the face veneer is thinner than the midline veneer... about 25% of the total thickness for each face, 50% for the inside one.).  The slope of the ramp is linear for the length of the gain. The corresponding (attachement) gain for the next plank is cut on the inboard side of the plank where it mates with the existing plank.  But how long and how deep to cut it?  I'm just guessing. The objective is for the o

Rinse, repeat

Image
I stripped off the clamps on the garboard horns, cleaned up the squeeze-out, cut the gains, and beveled the plank landings in preparation for hanging the second plank.  The results are encouraging. There are no signs of unfairness in the garboard strake, and the stem landing looks solid and shapely.   Plenty of squeeze-out in appropriate places all along the keelson.  I trimmed the plank overhang at the transom and cut the gains (the gradual, sloping reveal in the plank where the next plank lands, and gradually transitions from a lapped plank to flush joints where the planks meet the stem).  I'm cutting 9 inch gains (pictured above). Next, I tacked battens to the beveled landing edge of the garboard and one to the next landing marks on the frame stations, and hot-glued strips in triangular patterns to create the next pattern for the next pair of strakes.  I traced the pattern on paired sheets of the okume plywood and cut them out with the dozuki razor saw. I positione

Plank On!

Image
The garboard strake is in place.  I spent an hour or so fussing with the fit, did a dry run layup, recut the bow section to a closer fit, and repaired to my Mom's place to ponder how best to clamp it while the glue sets up (and build up my courage).  I settled on bronze annular ring nails for the keelson and the transom lands (rather than removable self-tapping screws or drywall screws). I traced the position of the keelson and stem on the underside of the planks, took them off and taped off the gluing area so as to reduce the mess from squeezeout. As cold as it is, I switched to the 'fast' hardener, installed a new set of pumps to measure proportionate aliquots, and ran through the sequence again.  Screwing up at this point would reduce my project to a messy pile of epoxy-contaminated wood.  It would be irresponsible even to burn it. The protocol for glue-up is to coat the mating surfaces with straight epoxy, then mix up up some epoxy putty (some saw dust and mi

Spiling for cheaters: the garboad plank is cut

Image
Spiling is the process of transferring measurements from the boat frame to planking materials so that they can be cut and fitted.  It involves transferring measurements from the boat frame to a pattern, and subsequently to planking material via the geometry of intersecting arcs, and connecting control points with a long batten.  Fussy.  Instructions for spiling in the books I have are obscure and difficult to follow, and conventional wisdom suggests it is more easily learned from an experienced person.  After reading and re-reading, I found another approach that seems simpler , and I have adopted it, at least until it fails me.  It feels a bit like cheating, but it makes complete sense to me from the get-go. The image above illustrates the alternative method.  Two battens are fixed to the frame along the planking marks, and adjusted so they appear fair.  Narrow strips (I used planking material scraps) are hot glued to the battens (in triangular patterns to assure rigidity).  Carefu

The winding road

Image
What was to have been a couple of days of sharpening dull edges has stretched into nearly a week. The viscosity of the holidays and the collection of some missing components for a sharpening station (and the fabrication of a simple jig for holding stones and setting honing guides) kept me busy.  So, too, the re-learning curve for the Lie-Nielson method of sharpening chisels and plane irons. I've come to the conclusion that a diamond lapping plate to keep the stones flat is a necessity for maintaining the discipline of sharpening.  A regular diet of the coarsest grit wet & dry paper on a glass plate will do the trick in a pinch (I haven't found coaser than 150 yet).   Flattening the 800 grit stone took a couple of those the first time through, and another to re-flatten after the first spate of sharpening. And a lot of time. The only good thing about not having sharpened recently is that I've done only modest amounts of damage to my better plane irons.  A concave st

Sharpening awareness

Image
  The frame is fair, the backbone is in place, and the beveling nearly complete.  Let the planking commence!  Except that my current count of sharp chisels and plane irons is 1 and 0 respectively... and that doesn't include the spokeshaves that should be sharpened for work on the stem. After a hard year of on-board maintenance, I am long-past due to recondition my edges, and perhaps recondition my attitude about keeping them sharp.  Using the 1.5 inch slick I brought back from Japan a couple years back reminded me of the pleasure of perfect sharpness, and how critical it is to achieving the desired result.   I've sharpened well in the past, and I can do it again, so I have declared a building moratorium until I have a sharpening station in place, and have restored the edges on my hand cutting tools. Lie Nielsen is one of the great hand-tool makers in the world, and I've acquired a few of their wonderful products over the years.  They are also a major exhibitor at th

Beveling and fairing the keelson and stem

Image
I took off the vertebral clamps from yesterday's glue-up and started fairing the result.  I have a first pass done the entire length of the backbone.  Next step is to check all the bevels carefully at every point along the keelson, and 'fair in' the stem with some pseudo planks clamped to the stations. I am on the threshold of cutting the garboard strake pair (the planks closest to the midline of the boat). about 2 1/2 hours

Getcha some backbone

Image
Yesterday I attached the transom to the building frame, screwed with angle brackets and vertical supports.  Positioning the transom on the supports is a bit tricky, as there are no fixed reference points for measurement. The keelson defines the centerline for the transom position... no ambiguity there. The full size plans for stations 5 and the transom indicate that the keelson notch for the transom should be approximately 4 inches below the notch on station 5.  Additionally, battens tacked to the sheer and one mid-plank landing project naturally to the transom landings to form a fair curve. Fiddling with the transom position with clamps eventually allows you to gradually adjust the transom until it approaches an optimal position.  Check, recheck, and screw the angle brackets in.  Done. This morning I beveled the keelson landing surface in the transom notch with my dozuki and the  1 1/2 inch chisel, dry fitted the entire assemblage, and mixed epoxy (150 ml).  It was too much by h

Daggerboard slot

Image
I almost forgot to do this -- cut the daggerboard slot in the keelson.  It seems unnatural to cut a hole in the bottom of a boat before you even plank it.  Or at all, for that.  Much easier now, though, when you can use a drill press to hog the waste and then trim it up on the bench.  It worked nicely. There are few creative pleasures to match paring a buttery wood like Alaskan yellow cedar with a really sharp chisel.  Amazing, though, how easily one pares one's fingers given a careless moment of opportunity.  I've signed most every woodworking project I've undertaken with my own blood on these occasions.  Today was the day for my Auklet.  The signature will be safely sandwiched between the two laminations of the keelson. About an hour and a half, including the signing.

Proving the building frame (part 2)

Image
I finished (I think) proving the mold today.  I measured each facet of each station mold to the nearest millimeter and adjusted with a block plane any that were more than 2 millimeters off so as to make the molds as symmetrical as I could manage.  Having used battens to simulate plank landings, and sighted the result from as many perspectives as the shop configuration allow, my confidence in a fair mold is growing. I purchased the 4 mm Joubert Okume plywood, as well as some additional Alaskan yellow cedar (for thwarts and floor boards) and some sappele for gunnels.  I think I have pretty much all the wood I'll need at this point, with the possible exception of knees and breasthook. Before I start the planking I'll glue up the keelson laminations,  cut the dagger board lumen,  mount the transom on the building frame, and glue the keelson to it so that the backbone of the entire boat is in place, stem to stern.  I'll finish beveling the stem, bevel the entire length of

Building-frame Proofing

Image
Stepping away to think, inspecting plans, and spending time in the 'moaning chair' tends to reboot the building process.  Or at least it seems to have done in this case.   Yesterday's confusion was resolved by the process of proving the building frame with battens and in so doing, developing a stronger belief in the lines of the boat. I'm not entirely finished with this process, but it has helped find the correct position of the transom and improved my understanding of where things will come together (the plank landings, especially at the stem, and also at the transom.  A lot of beveling to do at both places. I think this would be a good time to varnish the transom in preparation to actually attach it to the building frame for planking. I also glued the stem to the keelson today. about 3 hours.

The missing wood stretcher

Image
Today was a fiddly day, working on shaping the apron, refining of the shape of the transom, positioning the transom on the transom braces, beginning the process of establishing a fair line for the sheer-strake, and working the keelson into correct position. This later activity required adjusting the depth of the station mold notches. The keelson is laminated from two pieces, previously milled and dimensioned.  The pieces were a a couple feet longer than need be, so i clamped them in place and rough cut them to a more suitable length, estimating the position that the transom would be in.  Except that I missed.  By about an inch.  Short. I looked everywhere for the wood stretcher, but my brother hid it.  There was no alternative to milling another full piece, and scarfing the two too-short pieces into one long one, and sorting that bit out tomorrow. I scarfed the two pieces (8:1 ratio), and glued them up, leaving them to cure, and went on with the shaping of the apron with a spok

transom and stems

Image
I cleaned up the transom blank with my random orbit sander and traced the outline from the full sized pattern onto the blank.  The outline is delicate and more than casually important to the overall lines of the boat, so I decided to get a new Japanese saw for the job (the one I decided on has a stiffened back, analagous to a dovetail saw, and is called a dozuki saw.  The blank will require further fiddling with chisels, but I feel as though I am pretty close. I unclamped the outer stem after a day of curing, and cleaned up the excess epoxy (nasty stuff).  The blank fits well and should work nicely. All the pieces are now ready to attach the keelson, the transom, and the apron, or inner stem, to the building frame.  After that, the next challenge is to fair all the station molds, the keelson, stem and transom so that planking can begin. About 3.5 hours

Transom joinery

Image
One of the basic skills in cabinetmaking is jointing two or more boards to form a wider board.  I seem to have lost the knack.  I don't have the machine that makes the job easy and reliable, but a skilled craftsman will be able to achieve a good result with a hand plane.  I have only two boards to join, so it should have been straightforward.  I failed on two attempts.  I decided to take the tiniest shaving off each edge with my table saw, and then carefully long-board the edges with sandpaper.  The result was unsatisfactory.  My third approach was to joint the edges with a router, which requires setting up the boards with a gap just narrower than the width of the router bit, with a fence clamped so as to assure that a small amount is removed from each edge. This technique has the advantage that even if there is a deviation from the centerline, it can still do the job, as the 'error' is reproduced symmetrically.  The jig to achieve this is simple, but not trivial to set

Lamination Lamentations

Image
I had suppressed how messy an epoxy lamination glue-up is.  I had all the tools and materials laid out, waxed the template, rehearsed it all in my head, and guestimated the amount of epoxy i would need.  I mixed the resin and hardener (150 ml total), stirred thoroughly, and started slathering.  Each facing pair of the 8 is slathered and mated, then the 4 are made into two, then those faces slathered and joined until there is a single slithery 8 ply that is clamped to the jig, evened up, and adjusted.  Very messy. I had clamps to spare, but not epoxy!  I used all of it.  About 2 hours.

Actual Boat Parts

Image
I bought wood for actual boat parts this week - 20 board feet of Alaskan yellow cedar.  Light, strong, straight-grained, and decay-resistant, it is an ideal boat building wood, and local , sort of.  Not that it is less expensive for that! I took a guess at the amount, mostly simply wanting to get enough to get through the next phase of the build - transom, keelson, apron, and stem.  I'll have some wood left over from that, but not a lot. Today I ripped the blanks I cut yesterday and ran them through the thickness planer until they were the desired dimensions.   I also made the bending jig for laminating the apron and the stem. The picture shows all the parts I prepped today (except the keelson).  I hope to do a glue-up tomorrow. 

Building Frame and Station Molds

Image
The building frame and station molds are complete.  Nothing in the picture will ever be wet, but what is done now is the foundation for the rest.  Now its a matter of attaching a transom, keelson, apron, inner stem, outer stem, keel, skeg, and wrapping the whole thing in okume plywood, and fitting out the interior.  Oh... and painting, varnishing, making spars, rudder, oars, and dagger board. But from here on out, crafting actual boat parts will be involved.  Time to go buy some wood. My back-of-the-envelope time estimates suggested I would have 22 hour into this part of the effort.  It went much faster than that... 8.5 hours total. 

Off the dime

I acquired the books that will guide my progress through the building of Auklet.  One is Iain Oughtred's own guide to clinker plywood boat construction, the other I bought on impulse at the time I ordered the first: How to Build Glued-Lapstrake Wooden Boats (Brooks and Hill). It is useful to have more than one reference for such a project, though it also provides great excuses for dithering -- more choices on how to do things.  Since each of these books is written as a guide to an array of boats, they have many contingencies (If dory, then this, if skiff then that, etc.)  What one really wants is one well-illustrated, lucidly articulated book intended for your project alone.  I guess that's why people buy kits.  I at least have my near-ancient past history of building an ultralight canoe, though that is a distant, faded memory. But the project is launched.  I spent some time reading each of my references, and bought the materials necessary for the building frame, including

Tender Years

Image
The 2013 sailing season is over as the long grey tightens her grip on Seattle .  The successes of this past year's maintenance efforts substantially whittle away my list of excuses for not going cruising, but there remain several. Foremost: Ripple lacks a proper tender. This has been an issue from the start, and in fact I actually bought a dinghy several years ago -- A Fatty Knees fiberglass dinghy (a highly respected dinghy with a good reputation for functionality and build quality).  In my enthusiasm for having found such a gem at a decent price, I failed to realize the boat was too heavy for me to handle and too large to fit on Ripple's smallish foredeck, as inevitably will be necessary at times.  The boat was advertised as an 8 footer, but turned out to be 9.  Oh well. Soon after I purchased plans for an Iain Oughtred design dinghy, the Auklet.  Oughtred is well known for capturing the essence of traditional small wooden boats in glued-lapstrake designs that are li

Where was I?

Image
Oh, yeah... I sorta got distracted, I suppose. Since I last scribbled here I've replaced Ripple's batteries, modified how the battery selector works, added a shore power console (with proper breakers, fuses, and an over-the-top charging system), wooded every bit of brightwork on the exterior (except the boom and gaff spar), learned an enormous amount about varnishing (and become a life-long enthusiast for Le Tonkinois varnish), sewn a summer awning, reconditioned her boat cover, and, finally, had Ripple out of the water to do her topsides and bottom and mast. Each step of that process should have been documented in these pages, but operator error (that is to say, laziness) intervened. Having Ripple's mast off turned out to be the crux of the process.  And so very worthwhile.  If I can recover momentum here, I'll try to summarize the progress.  At the end of the fourth year of my stewardship, Ripple is in the best shape since I've had her, and it feels great.